Phase One Launches Capture One 20 and Brings Better Noise Control, Color Adjustments, HDR and more
Phase One has announced the launch of Capture One 20, the latest version of its photo editing software. Adopting a new, year-based naming convention, Capture One 20 boasts a number of improved features from Capture One 12, centering around refining the user experience.
Phase One says this latest version has been developed from user feedback but with a few ideas of its own as well. The improvements are based around the editing tools, both in terms of output quality and overall workflow.
Here’s a list of the new features found in Capture One 20.
New Basic Color Editor

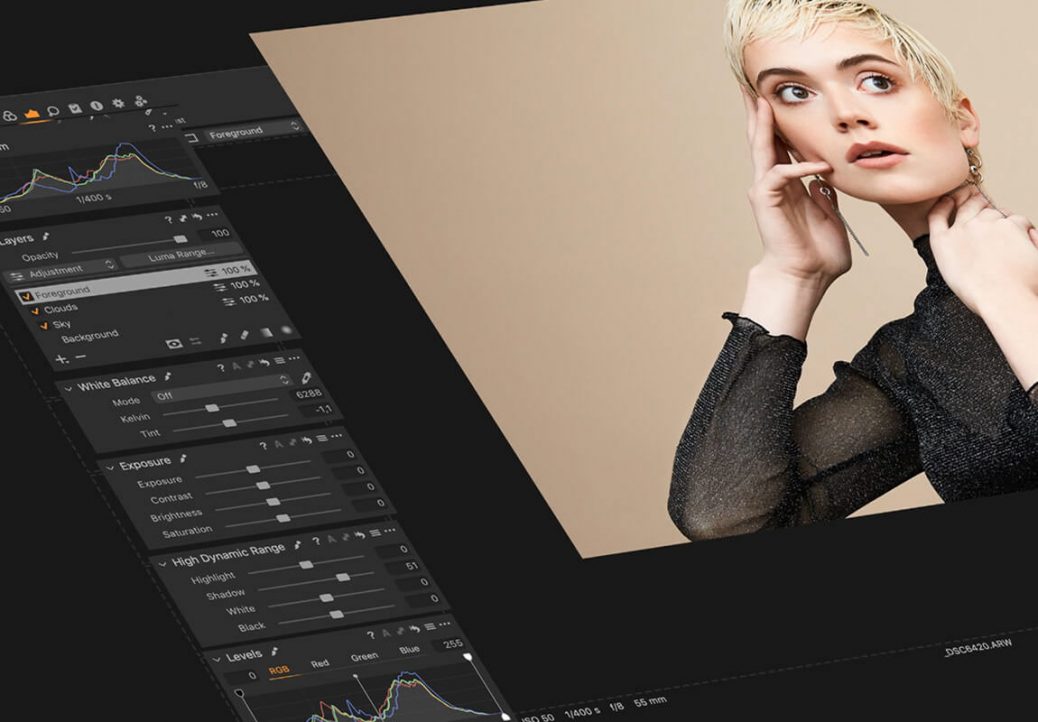
The Basic tab of the Color Editor has been re-designed to be more compact and at the same time provide more options than previously available. Two additional color ranges have been added, splitting the spectrum into eight ranges instead of six, with each available from color patches and adjustable with sliders that now show gradient colors, indicating their effect. Additionally, the Basic Color Editor now works on Layers.
The Direct Color Editor is the new Cursor Tool in the Basic Color Editor. It allows you to click and drag anywhere on your image and have the corresponding color change. The direction of your movement when dragging determines which slider you change, and the third option is available using the ALT key. The sensitivity can also be adjusted.
If you need to change the ranges, the spectrum is available from the (…) button. Any changes made to the spectrum will be reflected in the color patches and gradients on the sliders.
Crop Tool

The new Crop tool is at once the most advanced crop tool to be implemented in Capture One, and the most straightforward to understand and use.
With Capture One 20 it is now easier to crop with more easily visible edges of the crop thanks to new handles. New modifier keys have been also been introduced, allowing cropping from center [ALT] and locking the current aspect ratio [Shift]. Additionally, freehand rotation can be accessed by either moving the cursor outside the corner of the crop, of by using the modifier key [CMD/CTRL], and upon request, Hitting return/enter while using the Crop Tool will now switch to the Pan Cursor Tool and show the image in its cropped state.
All of this builds on the existing Crop Tool which allows users to do the industry standards such as setting aspect ratios and specific crop size by value, but also allows you to Crop to Path where Capture One will embed the crop outline and dimensions as a Photoshop Path when using a PSD file; auto-crop for lens distortion, and change the crop grid from the standard to specialized grids like the Golden Ratio, Fibonacci Spiral and so on.
High Dynamic Range Tool

The High Dynamic Range tool targets primary areas of detail recovery and contrast along the tonal range. Historically for Capture One that has been the Highlights and Shadows, controlled via sliders that could strictly move in the direction of recovery without a way to amplify either the shadows or highlights.
Capture One 20 brings a new, improved, and expanded feature-set to the High Dynamic Range tool with the addition of White point and Black point sliders, and now all sliders zero out in the center and can be moved left or right to either recover detail from the shadows and highlights or exaggerate them and boost contrast.
This means the High Dynamic Range tool is now more powerful than ever, as it enables fine-tuning of contrast in a fast and easy way. It’s meant for high-speed workflows and as a supplement to the more advanced control one can achieve with Levels and Curves.
Noise Reduction

Capture One’s approach to noise reduction has been a tailored one as all cameras have their own noise reduction for each ISO and Capture One optimizes for each supported camera.
In Capture One 20, the Noise Reduction Tool has been re-engineered for improved performance. It tackles noise on two fronts: luminance noise and color noise, while Capture One 20 brings improved recognition of patterns and edges; better color noise reduction; bigger impacts from the Amount slider, and stronger noise reduction for images shot with a high ISO. Not only does it provide a higher level of noise reduction and detail retention, but also holds color accuracy. This will be a boon for any low light shooting, particularly for genres such as weddings, events, concerts, and more.
The tool is intelligent. The default setting will provide noise reduction results based on ISO setting. Because of this, Capture One 20 will provide pleasing results – even without tweaking noise reduction.
Scrolling Tools

The re-designed Tool Tab navigation makes it easy to work more quickly and intuitively, allowing users to scroll through all tools with ease and pin favorites to the top for instant access.
As suggested above, every Tool Tab now has two sections; a pinned section and a scrollable section. The new default workspace for Capture One 20 has tools divided into both sections, the purpose of which is to allow pinning of tools to the top of the tool tab while scrolling below.
Tools can be easily moved between the two sections, either by dragging or by opening the tool submenu (…) and selecting “Move Tool to Pinned/Scrollable Area.”
If preferred, users can, for example, put all tools in the pinned area, effectively making Capture One 20 function just like previous versions.
Appearance & Interface

With Capture One 20, creatives can Identify tools more easily with labels, instantly access Masking tools, and adjust the viewer background color with one click. Plus, users get even more precision and consistency with a redesigned white balance picker.
Improved copy/apply of Layers

Capture One 20 opens up for a more flexible, layer-centric workflow. It is now possible to select which layers to copy to other images, where previously one would have to copy everything or nothing. Additionally, the Layers that get applied to other images will now be added on top of any Layers that might already be present, instead of replacing them.
It is now possible to copy and apply Layers between images of different dimensions as well, making it much easier to streamline a workflow where, for example. multiple cameras are used, and Styles are applied to Layers.
Support for DNG files

DNG files come in all shapes and sizes. If Capture One has implemented support for a camera model, the DNG file it creates will have individually tweaked colors with our custom profile. With Capture One 20, DNG files from camera models that are not supported will still look great. This opens up for great color profiling of all smartphones, drones and camera models that capture in DNG format.
Select Next When


For shoots that involve high-volume sorting, like weddings or other events, culling has been made easier with Capture One 20. You can now enable automatic switching to the next image once you star rate or color tag an image. These can be toggled independently. Find the new feature within ‘Select > Select Next When’.
This functionality also works with Sets (a selection of multiple images). Select multiple images and disable ‘Edit All Selected Variants’. When star rating or color tagging, the selection will move through the Set and switch to the next Set of the same size once the last image is rated.
Capture One 20 is available starting today with versions that limit support to camera models from Fujifilm and Sony (Capture One Pro Fujifilm 20 and Capture One Pro 20 for Sony, respectively). Customers have the choice to purchase Capture One 20 for $299 ($159 to upgrade from a previous version) or to sign up for a subscription to receive access to it for rates starting at $15/month. The Fujifilm and Sony versions of the software are slightly cheaper at $129 per license or $8/month.
More info on Capture One’s website.